Try Movavi Video Editor!
- Add stylish captions and titles
- Apply filters and effects
- Stabilize and reverse video, equalize sound, and more
Best Software to Add Captions or Subtitles to a Video in 2024
Want to add subtitles to a video? There are several ways and a few different software solutions available, but which one is the best way to add those captions, and how can you learn how to add subtitles to a video? For this review, we tested and compared six apps to try to find the best software to get professional-looking, readable captions, and subtitles for your videos.
Whether you’re a veteran editor and you have experience with apps and programs like iMovie and Premiere Pro, or you’re brand new to video editing, you want the best app to add captions to the video. Read on for pros and cons, step-by-step instructions, how to add subtitles to a video without a watermark, and suggestions on which free and paid software will do the job you need – on your computer or online using a browser like Chrome or Firefox.
Here’s what Movavi’s team does to provide you with verified information:
When selecting products to include in our reviews, we research both demand and popularity.
All products mentioned in this article have been tested by Movavi Content Team.
When testing, we aim to highlight the best features of a product and what it’s best suited for.
We study user reviews from popular review platforms and make use of this information when writing our product reviews.
We collect feedback from our users and analyze their opinions of Movavi software as well as products from other companies.

Captions vs. subtitles: What’s the difference?

You’ve probably heard people refer to captions and subtitles interchangeably, but they’re actually two different things. So, if you want to add captions to a video or you want to learn how to add subtitles, you’ll first want to know what sets the two apart – and which one you actually want to add to your video.
Captions have been around since the 1970s when they were first added to some television programs to help deaf people enjoy the same shows that hearing people watch with no problem. Captions went over so well with people who are deaf and hard of hearing that, by the 1980s, they were actually mandated for all U.S. broadcast TV. The captions you saw in the 1970s, and most of the ‘80s were permanently part of the video and couldn’t be turned off. Thus, they were called “open captions.” Captions that could be turned off were soon introduced, which is where we get the term “closed captioning.”
Subtitles, on the other hand, have been around since the 1930s. They were first created in the transition from silent to audio films. Basically, in silent film days, there was no language barrier in most films because there was no audio dialog. When “speakies” started becoming popular, people who didn’t speak the language of the film were left scratching their heads – until someone figured out adding subtitles to the video.
So, when we look at subtitles versus captions, what’s the main difference? Captions are created for the hearing impaired, and they include descriptions of non-spoken sound effects as well as spoken language. Subtitles are created to help people who don’t speak the language of the video understand it better. Subtitles include dialog, and they may even include the translation of lyrics to a song playing in the movie or video, but they won’t include other sound effects.
Why should you add captions to videos?
Now, before we get into the details of how to add captions to videos, let’s talk about why you should go to the trouble to add captions and/or subtitles to your videos. We’ll explore a few scenarios in which you might want to add captions or add subtitles to a video online.
Create more engaging videos with captions and subtitles
Captions and subtitles attract attention and increase inclusion. They make it easier for your audience to engage with your videos, and they increase view times. With the right captions, video makers and content creators can easily practice inclusivity and bump up views and subscriptions. How do subtitles and captions do all that for your videos? Consider your audience’s experience, who they are, and where they might be when watching your videos.
Your audience won’t always have sound turned on
How often do you find yourself scrolling through Instagram, Facebook, Twitter, or TikTok with no sound? All the time, right? Whether you’re at work, taking public transit, or it would otherwise be impolite or inappropriate to play sound loudly from your phone or another device, you can’t always watch videos with the sound on. Knowing that this is true not just for you but for your audience as well, why not make life easier and help them engage with your video content without turning up the volume?
Improve accessibility for people with hearing impairments
As we mentioned above, captions were first introduced to television shows to help people with hearing impairments. People with limited or no hearing ability want to engage with your content, but they miss out on a lot if they don’t have any way to understand the sounds and language in your videos. Make it easier for them by adding closed captioning to your videos. Including captions is a great way to increase your audience by practicing inclusion.
Watch times increase with captions
Captions grab people’s attention. Even hearing audiences who could turn the volume up (and may be watching your video with volume on) tend to get more engrossed with captioned videos. There’s something about seeing the words on the screen that draws viewers in, and they can’t stop reading (and watching).
So, now that you have a few reasons to add captions to your videos, let’s talk about how you can do it quickly, easily, and without spending a ton of money. Not all of the options we tried are free. Still, most of them offer a low-cost or free way to add inclusive captioning that will help you create cool, professional-level videos so you can increase engagement and really make the most of your video creations.
How to add captions to videos with different software

Main features: Subtitles, captions, titles, stylization, filters and transitions, picture-in-picture, stabilization, chroma-key, multiple video formats
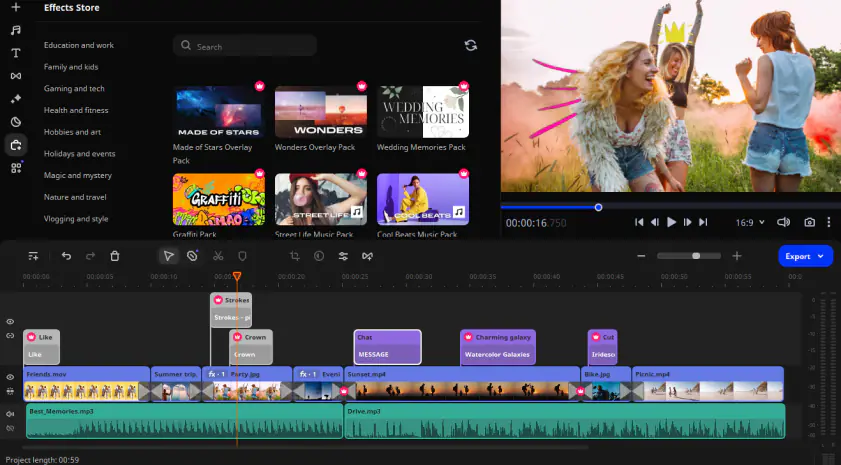
Movavi lets you easily add subtitles to your videos, and it offers multiple editing features that can help make videos look and sound more professional. This desktop video app gives you the power to create engaging, polished videos that are inclusive and cool. Along with subtitles and captions, you can also include titles, transitions, filters, stabilization, and other features to take your video to the next level. You can download Movavi Video Editor for Mac or Windows.
Instructions:
Download and install Movavi Video Editor.
Open the subtitle embedder and click Add Files.
Drag your videos onto the Timeline.
Click the Titles tab on the left and select the basic or animated caption style you prefer.
Drag your chosen title style over to your Timeline.
Double-click the title and add the text you want to include.
Click Clip Properties to adjust the duration and speed of your subtitles or captions.
Adjust the font to a style you like by clicking Font Properties and changing the font settings to fit your needs.
If you want to change the color of your captions or subtitles, click Color Properties.
Click Export, then Start.
Pros
Easy editing and video enhancement
Add professional-looking titles, transitions, and filters
Intuitive caption and subtitle creation and syncing
Lots of features, like stabilization and sound equalization
Cons
Minor limitations on color tuning capabilities
Main features: Trim, cards, end screens, captions, subtitles
YouTube Studio, YouTube’s suite of built-in video editing tools, gives users some limited options to trim videos, add cards and end screens, including video thumbnails, and insert closed captions. The editing capabilities here aren’t highly sophisticated. Editing a video in YouTube Studio can feel a lot like editing on your iPhone or Android.
Instructions:
Go to YouTube Studio.
Open YouTube Studio
Choose Subtitles from the left menu.
Click the video that you want to caption.
Click ADD LANGUAGE and choose the language you want.
Click ADD under subtitles.
Pros
Automatic closed-caption capabilities
Fast, basic edits
Cons
No control over subtitle text
Limited editing features
Must be online to add captions
Main features: Subtitles, captions, formatting for social channels, audio matching for subtitles
Adobe® Spark® is an online tool that allows users to edit videos and add subtitles to videos for free. While Adobe® Spark® does allow you to add subtitles and/or captions to videos for free, not all features are available without paying for an Adobe subscription. You’ll need to be online to do your video editing and add captions with Adobe® Spark®.
Instructions:
Upload the video you want to caption to Adobe® Spark®.
Select the + button on the first frame to add your video to the editing timeline.
Use the + button to add text to the slide.
Drag text to place it where you want, or use the Layout tab.
Download your video with captions.
Pros
Simple user interface
Good for social videos
Cons
Limited video editing options
No way to make multiple social posts with one file
Manipulating graphics can be difficult
Main features: Captions, subtitles, filters, animation capabilities
Corel’s VideoStudio is a paid program, so it’s not the best choice for a free way to add captions to videos. However, users looking for an alternative to Premiere Pro and other paid programs may find it comparable to these robust tools.
Instructions:
Install VideoStudio and import your video to your timeline.
Right-click on the clip in your timeline and choose Subtitle Editor.
Review the automatically-generated subtitle text and make any necessary changes.
Save your video.
Pros
Easy subtitle generation
Subtitle editing capabilities
Cons
Limited choices for transitions and other editing features
Infrequent and inconsistent software updates
High price
Main features: Convert audio and video to text
Rev is not a video editing app. Instead, it provides translation services for audio and video files into captions and subtitles. For $1.25 per minute, you can get transcriptions or captions created from your existing video. For $3-7 per minute, you can get foreign subtitle translations. Unlike the other options, this is also not an instant solution for your captions. But, if you need captions generated for your videos, you can get them in 24 hours or less.
Instructions:
With Rev, all you need to do is send them the file you want to transcribe. Then, you’ll receive an invoice. After the invoice is paid, the transcribing will start. You’ll receive the transcript in around 24 hours.
Pros
24-hour turnaround
99% accuracy
Cons
Paid service
Must use separate video editing software to add captions
Main features: Automatic transcription and subtitle generation
Happy Scribe is an automated transcription and subtitle service that offers a fast and accurate way to add subtitles to your videos, with an additional option of human proofreading. It supports over 119 languages and can handle files of any size. It is an online tool and requires no download, which makes it a convenient choice for many users.
Instructions:
Visit Happy Scribe's website and create an account. Upload your video file and select its spoken language. Wait for the transcription to finish, review it for accuracy, and then export the transcription as subtitles in a preferred format, like SRT or VTT.
Pros:
Fast and accurate transcription and subtitling
Convenient online tool
Cons:
Not suitable for videos with poor audio quality
AI transcription may require manual editing
Conclusion: The best way to add captions and subtitles to videos
Now you have a better view of six of the best ways to add captions to your videos. There are lots of free and low-cost options for online services and software that you can download for Mac or Windows, and you can even add captions on your phone if you need to.
But what’s the best way to add captions to your videos? Each of these programs gives you the capability to either add captions or subtitles for people with hearing impairment or people who don’t speak the language in your video. If you don’t have a transcript written, you can either write it out yourself, try an option to auto-generate captions or use a service like Rev to convert audio to captions or subtitles for you. The best way to ensure that your captions are accurate to your video, though, is to write them first and add them to your video when editing.
If you’re looking for an easy way to add captions or subtitles to your videos, we recommend downloading Movavi Video Editor. It’s a robust video editor, and it gives you the power to enter captions or subtitles anywhere in your video. Plus, Movavi Video Editor offers a lot of other features – like titles and transitions, chroma key, and lots of filters – to edit your videos and make them really stand out. With Movavi’s user-friendly interface and a wide variety of editing features, it’s a great solution to all of your captioning and editing needs. Try downloading it today and see if Movavi Video Editor is the best way to add captions and subtitles to your videos.
Movavi Video Editor
Сreate awesome videos easily
*The free version of Movavi Video Editor may have the following restrictions depending on the build: watermark on exported clips, 60-second video or 1/2 audio length limit, and/or some advanced features unavailable when exporting videos.


Have questions?
If you can’t find the answer to your question, please feel free to contact our Support Team.
Join for how-to guides, speсial offers, and app tips!
1.5М+ users already subscribed to our newsletter