Try Movavi Video Editor!
- Crop and split videos easily
- Edit and enhance your clips
- Export the results in various formats
How to cut a video in After Effects®
After Effects® is an extremely powerful piece of software from Adobe®, which gives the average user access to some amazing capabilities and professional effects. This is Hollywood-level software. You can learn how to cut footage in After Effects® to shorten a video, but there is so much more that this software can do. Below, we explore how to trim a video in After Effects® software, as well as offering an alternative. Remember that After Effects® is a powerful kit, and it needs quite a bit of processing power. Follow the link below to learn more about the program.
How to cut videos in After Effects®
Let’s explore how to split a clip, splice clips together and shorten a video in this software.
Step 1. Launch After Effects® and import the video
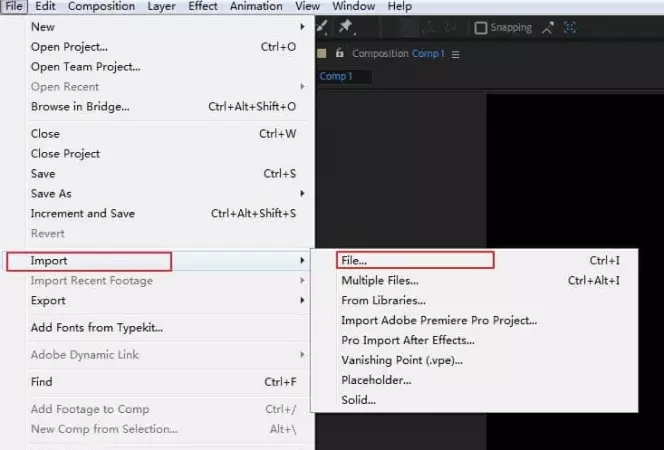
Open up a new project and load the video footage in After Effects® that you want to edit. Click Import and then File if you need to add video before learning how to cut in After Effects®. Once in place, drag your video onto the timeline.
Step 2. Select and slice the layer
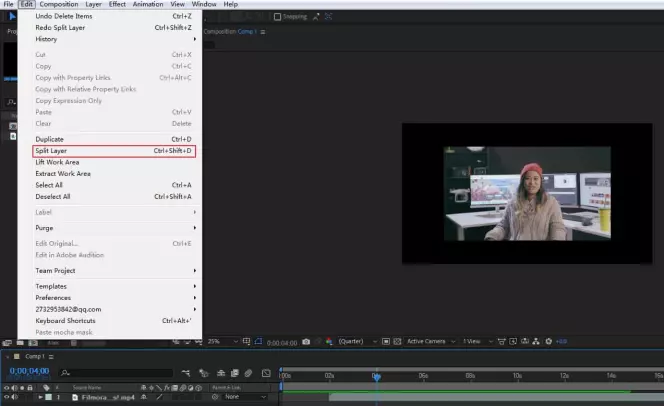
To cut a video in After Effects®, you first need to select the appropriate video track in your timeline. Next, to shorten a video or trim in Adobe After Effects®, go to Edit and then Split Layer. This is how to split a layer in After Effects®, which will turn it into two separate clips. One can then be deleted if needed. If you want, you can use Ctrl, Shift, and D to do the same thing.
Step 3. Render the project
Once you’ve cut the video in After Effects®, it is time to render it to a finished product. This can be done by simply choosing File, then Export on the menu. This will allow you to add it to the render queue and select the file type and where you want it to save to. After this, you can enjoy your After Effects® cut clip, finished and as you intended it. Before rendering, you can even experiment with some of the powerful tools such as Gyroscoping within the software.

How to cut a video in Movavi Video Editor
Though loads of people are looking to find out how to cut videos in After Effects®, if you don’t already have the software it can be very costly to get started with. You can access the same basic editing functions on software like Movavi Video Editor. You can split clips, create scenes, and access a cut tool for trimming your video down to the length you need or cutting out the bits you don’t want or need.
Step 1. Install Movavi Video Editor
Download and open the installation file and install the program following the onscreen instructions. Movavi Video Editor can be installed on Mac or Windows machines just as easily.
Step 2. Choose the file that you want to cut
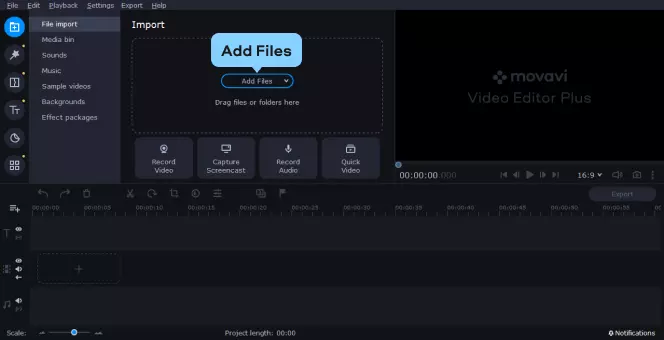
Click Add Files and select the video you want to cut. Then drag and drop your file into the Timeline.
Step 3. Cut your video clip and remove unwanted parts
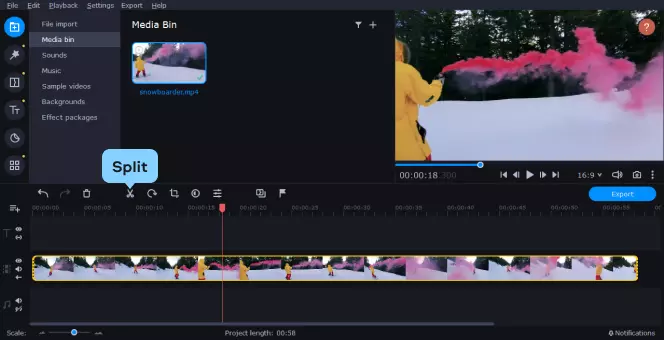
To cut a video clip in half, click on the video on the Timeline and move the red marker to the point in the video where you want to split it. Next, click the Split button. Your video will be split into two parts.
To cut out an unwanted part of the video, place the red marker at the beginning of the unwanted segment and click Split. Next, move the red marker at the end of the unwanted segment and click Split again. Hit the Delete button to remove the part from your video.
Step 4. Save your finished product
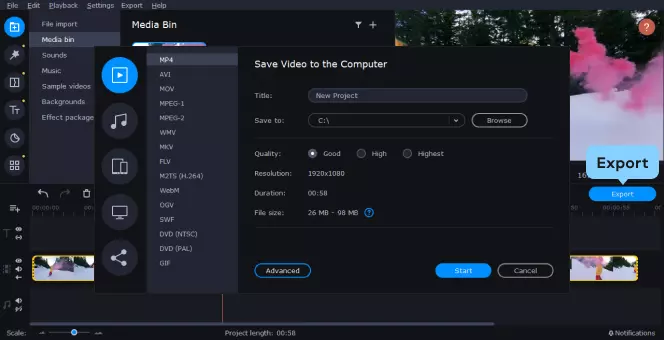
After the cutting is done, save your video in an appropriate format. Click Export and choose the format you want to save the cut video in. You can choose any video format, including AVI, MPEG, WMV, MP4, FLV, and MOV.
As you can see, people who are looking to cut a video in After Effects® may not actually need to delve into this complex software.
A lot of people are looking to know how to cut clips in After Effects®, but it is one of the more basic aspects of video editing, and you may not need to go into this much depth to shorten a video. Luckily, whether you choose After Effects® to cut a video or you go for a different option such as Movavi Video Editor, the steps to get to your end result are very simple. Just import the video, trim your clip to size, delete anything you don’t need and then export. You can also take advantage of other video editing features such as layering or trimming to create a professional video whether you are using After Effects® or other software.
Movavi Video Editor
Сreate awesome videos easily
*The free version of Movavi Video Editor may have the following restrictions depending on the build: watermark on exported clips, 60-second video or 1/2 audio length limit, and/or some advanced features unavailable when exporting videos.


Have questions?
If you can’t find the answer to your question, please feel free to contact our Support Team.
Join for how-to guides, speсial offers, and app tips!
1.5М+ users already subscribed to our newsletter