How to Brighten a Video: Best Ways
To brighten your video, use Movavi Video Editor!
1. Download and install the program.
2. Add a video clip to brighten up.
3. Adjust the video brightness.
4. Save the edited video.
If the lighting on a video is poor, it doesn’t matter how good the camera resolution is. Unfortunately, it isn’t always easy to get the right settings on your video camera or smartphone to improve this – there are plenty to choose from, after all. If you’re struggling, you can use a video editor to brighten dark videos quickly afterwards.
If you’re wondering how to brighten a video, and you don’t know which tool to use, this guide will explain how and what tools to use. Here’s a quick shortlist of some video lightening editors you can use to get you started.
At Movavi, we’re committed to providing you with verified information only. Here’s what we do to ensure this:
When selecting products to include in our reviews, we research both demand and popularity.
All products mentioned in this article have been tested by Movavi Content Team.
When testing, we compare key parameters, including video and audio trimming, visual effects, stabilization, video quality adjustments, saving and sharing videos, and other significant features.
We study user reviews from popular review platforms and make use of this information when writing our product reviews.
We collect feedback from our users and analyze their opinions of Movavi software as well as products from other companies.

Rather than upload your photos to a PC or Mac, you can brighten dark videos on the go using your iPhone or Android smartphone using an app. There are no software with free download options, such as online video editors, that will work as well as tools like Movavi Clips and InShot do on your smartphone.
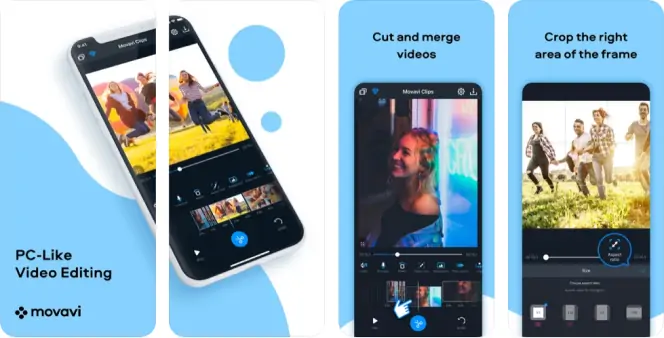
Movavi Clips is an advanced, powerful, but easy-to-use video editor for your smartphone. It brings the power of Movavi’s desktop editor to mobile devices, allowing you to crop and rotate videos, as well as brighten videos, add text or image filters, insert music tracks, and more.
You can save your video or export it directly to social media, allowing your friends and family to quickly view your changes. Movavi Clips is free to use (with some limitations), but you can try all paid features with a built-in free, three-day trial.
If you want to fix the video brightness using Movavi Clips and brighten videos on iPhone and Android devices, here’s what you’ll need to do.
Before you begin, download and install the Movavi Clips app from the Google Play or Apple App Store using the links below.
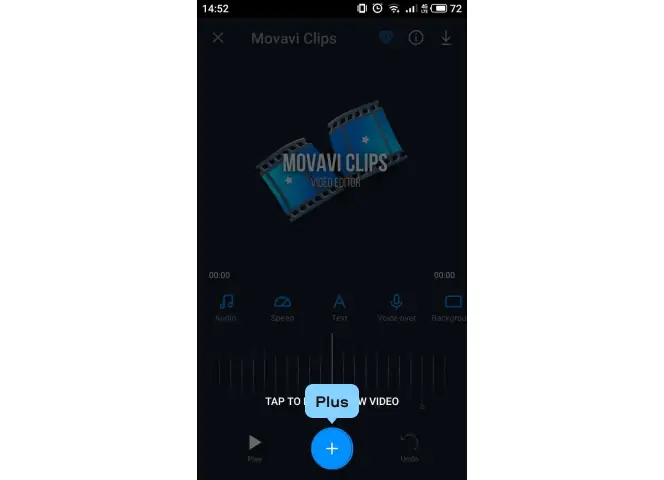
After installing Movavi Clips, launch the app and tap the Plus icon at the bottom to select your video clip. If necessary, grant the app the necessary permissions to access your local video files.
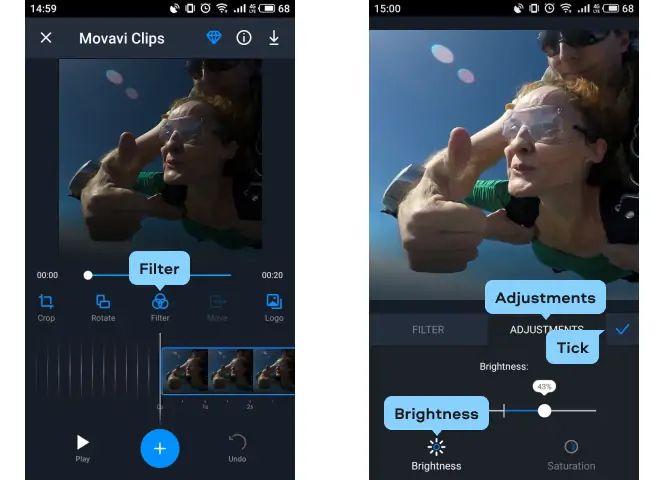
In the main video editing menu, swipe right through the various tools, then tap Filter. From there, select Adjustments from the options, then choose Brightness.
Using your finger, move the Brightness slider right to increase the brightness or left to decrease it. If you’re happy with the video preview above, tap the tick icon to save your choice.
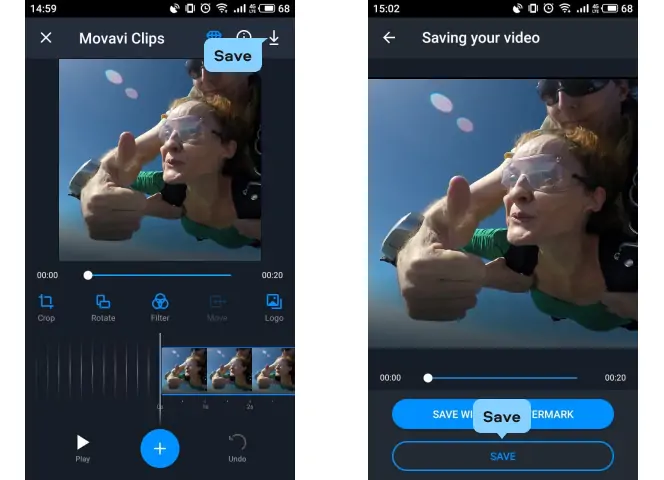
Adjust your video further using Movavi Clips’ extensive video editing tools, if you need to. If you’re happy with the video brightening, you can save the video by pressing the Save button in the top right.
You can preview your video one last time in the Saving your video menu before tapping the Save button at the bottom. If you don’t have a premium subscription, you may see a watermark applied to your video in the bottom-right corner of the video file.
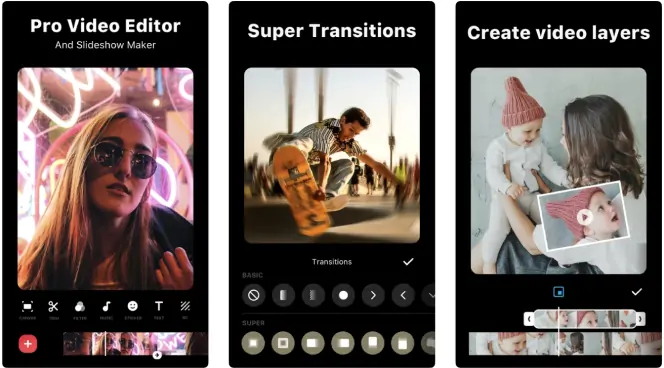
InShot is an alternative video editing app for iPhone, iPad, and Android users. It has a number of professional-grade features that allow you to cut up, trim, merge, and alter your video clips. You can also apply custom transitions, filters, audio tracks, text, and more.
InShot is made for social media lovers. It allows you to quickly pick up your video snaps, edit them, and then post them to your TikTok or Instagram accounts. It’s free to use, although some transitions and effects require an in-app subscription.
If you want to use InShot to brighten a video on iPhone and Android devices, here’s what you’ll need to do.
1. Download and install InShot
You’ll need to start by downloading and installing InShot on your Android, iPhone, or iPad device using the links below.
2. Select the video clip for editing
Once the InShot app is installed, open it on your device and press Video to select a video clip to edit. Using the on-screen menu, choose a video file (or files) to edit, then press the green tick icon in the bottom-right.
3. Adjust the video brightness
The video clip (or clips) you selected will appear in the edit menu. To brighten the video using InShot, tap Filter, then Adjust using the carousel options at the bottom.
Make sure the Lightness slider is selected by tapping the icon. Using your finger, move the Lightness slider to the right to increase the video brightness. If you need to decrease the brightness, move the slider left instead.
When you’re ready to save your changes, tap the tick icon directly above the slider twice to return to the main editing menu.
4. Adjust the video brightness
In the main editing menu, you can make further changes to your video clip (such as trim the video, apply text or music, etc). If you’re happy to save the brightened video clip, press Save in the top-right.
You’ll need to choose the resolution and frame rate you’d like to use for your video clip, with the estimated file size listed beneath. Make any additional changes (or leave the settings intact), then tap Save again to save the edited video clip.
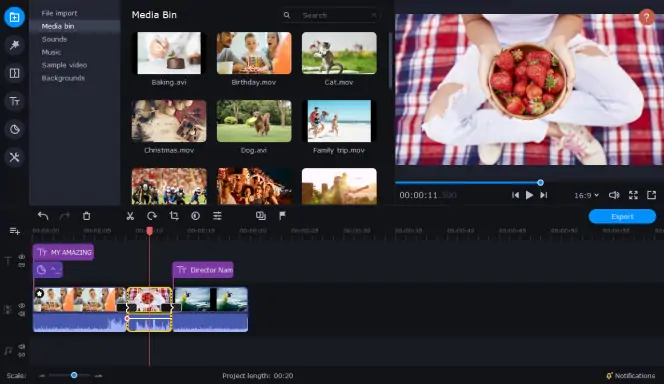
One of the best ways to lighten a video on a Mac or Windows PC is to use Movavi Video Editor. Professional-grade features in a beginner-friendly interface, Movavi Video Editor can help you create the videos you need with ease – no difficult-to-understand features or user interfaces to decipher here.
Movavi Video Editor will let you brighten your video clips in just a few clicks. It can crop, rotate, and trim your video files, or you can apply transition and filter effects, custom music tracks, Instagram-friendly stickers, and more. Whether you’re a beginner or pro, Movavi Video Editor is the perfect tool for video editors, and you can try it free with a 7-day trial.
If you’re unsure how to lighten a video, Movavi Video Editor will get the job done quickly on Windows or Mac. Here’s what you’ll need to do.
Start by downloading the Movavi Video Editor installation file on your Windows PC or Mac.
Once you’ve downloaded the installation file, open the file and follow any on-screen instructions to complete the installation.
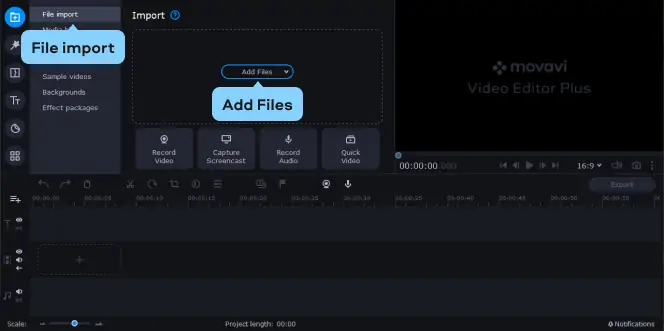
Open Movavi Video Editor once the installation is complete. Drag your video file into the File import section to open it, or press Add Files to select it manually.
The video file will appear in the Media Bin – drag and drop the file into the Timeline section at the bottom of the window to open it for editing.
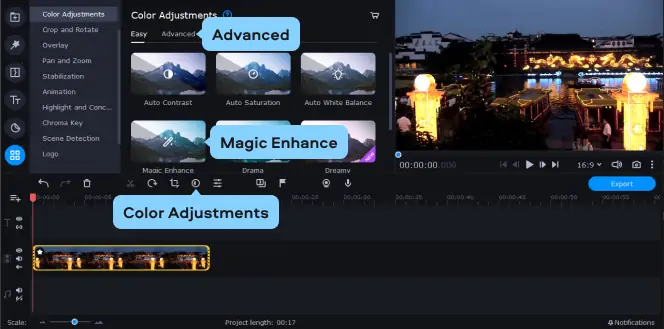
To adjust the brightness, press the Color Adjustments icon above the Timeline section. Press Magic Enhance to automatically improve the video’s brightness and contrast levels or select the Advanced tab to change these settings manually.
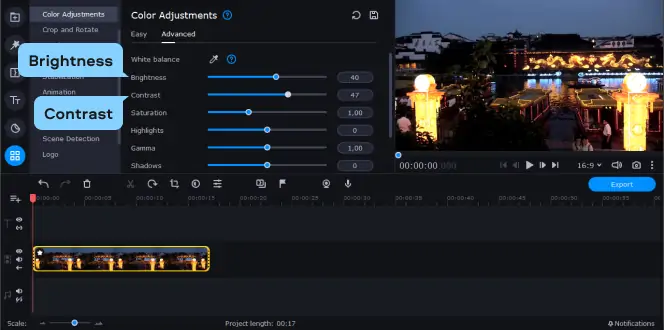
In the Advanced tab, move the Brightness and Contrast sliders towards the right to increase those settings, or left to decrease them. Make any additional changes to your video’s color settings (such as saturation and tint levels) as required.
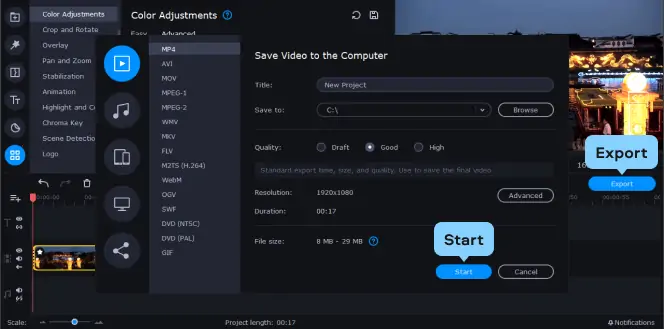
When you’re ready to save the video, press the Export button. Confirm your file output settings, including the video title, resolution, quality, and file type, then press Start to save the video.
Movavi Video Editor
Сreate awesome videos easily
*The free version of Movavi Video Editor may have the following restrictions depending on the build: watermark on exported clips, 60-second video or 1/2 audio length limit, and/or some advanced features unavailable when exporting videos.
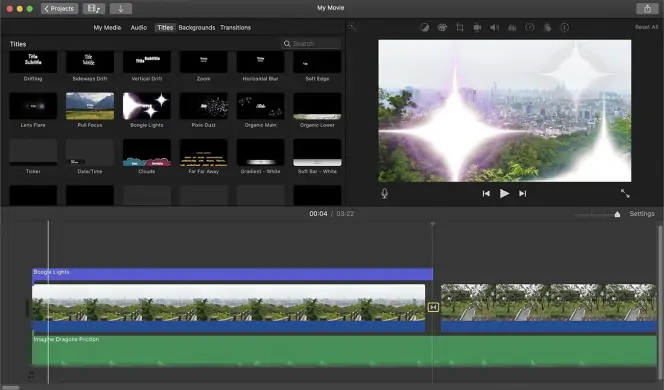
While Movavi Video Editor is one of the best tools available to brighten a video on a Mac, you can also use the built-in iMovie app to do this. iMovie is Apple’s free video editing tool and although it’s limited in features, it does allow you to improve the brightness on darker video clips.
iMovie should come with your Mac but, if it isn’t installed, you can download the software for free using the link below.
If you want to know how to make a video clearer and brighter using iMovie on a Mac, here’s what you’ll need to do.
1. Open a video clip in iMovieTo start, open iMovie on your Mac and press Create New > Movie to create a new video editing project. Press Import Media to insert a video clip into your iMovie project.
Make sure to drag and drop the inserted video clip into the Timeline section at the bottom afterwards.
2. Adjust the video brightness
With the video clip selected, you can automatically adjust your video’s brightness and other color settings by pressing the Color Balance button above the video preview, then pressing the Auto button.
Otherwise, press the Color Correction button next to it to change your brightness and contrast settings manually, then move the various sliders in the multi-slider panel on the right to increase the brightness and contrast. If you want to decrease these values, move the sliders to the left instead.
3. Save the video
Once you’ve edited the video, you’ll need to save it. To do this, press Share > Export File in the top right.
In the File window that appears, confirm your file resolution, format, quality, and compression settings, then press Next to continue. You’ll need to choose a file name and save location for your clip, then press Save to save the edited file.
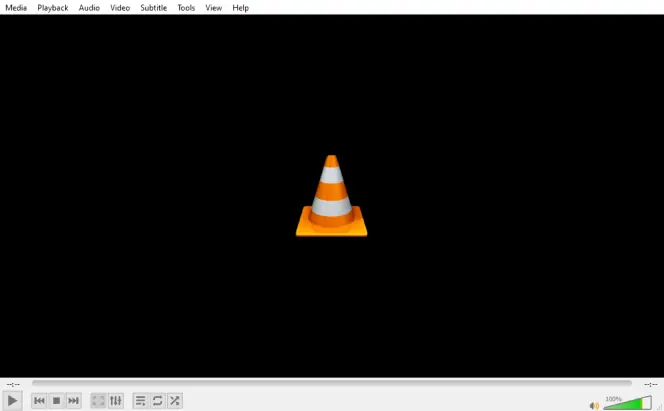
If you’re struggling to use a video editor, you may be able to brighten dark videos quickly using the popular VLC video player. Freely available for Windows 10 and Mac users, VLC is the go-to player for playing almost every type of video file imaginable.
Lesser known, however, is VLC’s tools for tweaking videos during playback. If you’re struggling to see a dark video in VLC, you can increase the brightness and contrast levels in the settings menu. You can download VLC by following one of the links below.
Download VLC for other operating systems
If you want to brighten dark videos for free in VLC, here’s what you’ll need to do.
1. Open a video file in VLC
To start, open your video file in VLC by pressing File > Open File.
2. Adjust the brightness settings
Once you’ve opened the video, you’ll need to open VLC’s settings menu to change the brightness and contrast.
On a Windows PC, press Tools from the menu bar, then press Effects and Filters. In the Preferences window, select Video Effects > Essentials, make sure that the Image adjust checkbox is selected, then move the Brightness and Contrast sliders to the right to increase their values (or left to decrease them).
On a Mac, press VLC > Preferences in the menu bar. In the Preferences menu, press Video > Show All to view all of the video settings. From the side-menu, select Video > Filters > Image adjust, then increase the Image contrast and Image brightness values to increase those settings (or decrease them, if you prefer).
3. Save the settings
Once you’ve applied the brightness changes to your VLC settings, press Close (on Windows) or Save (on Mac).
If the change is successful, VLC should make a dark video more visible with increased brightness and contrast settings as your video plays.
How to use Adobe® Premiere® Pro – a professional video brightener
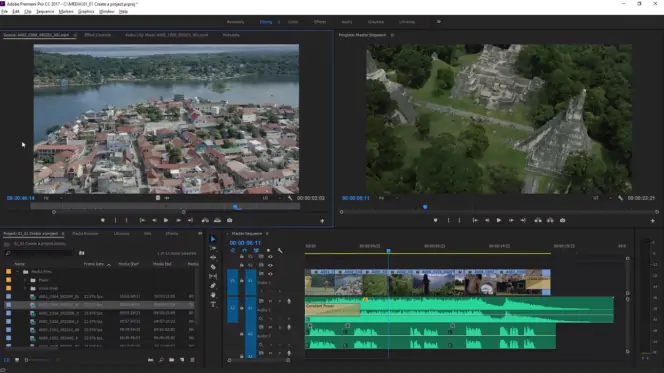
If you’re a Hollywood filmmaker, TV producer, YouTube content creator, or another type of video creating professional, you’ll probably have Adobe® Premiere® Pro in your video editing arsenal.
This powerful video editor supports almost any feature you can imagine needing, from basic crops and trims to complex 3D transitions and effects, with support for up to 8K video and VR support included. It’s complex, it’s powerful, and if you need it to enhance a video to make it lighter, Adobe® Premiere® Pro can do that, too.
If you want to brighten a video using Adobe® Premiere® Pro, here’s what you’ll need to do.
1. Open your video in Adobe® Premiere® Pro
To begin, open your video clip and make sure it’s visible in the Timeline section at the bottom of Adobe® Premiere® Pro’s interface.
Once you’ve inserted the clip, make sure to select it in the Timeline section to make changes.
2. Adjust the brightness settings
With the clip selected, press Effects in the menu to the right of the Timeline section. From there, press Video Effects > Color Correction > Brightness and Contrast. Drag the Brightness and Contrast effect and drop it onto the selected video track in the Timeline section.
This will allow you to make changes to the brightness and contrast levels in your video clip, using Adobe® Premiere® Pro as a video brightener and video lighting editor. In the top right, use the Effects Controls menu panel to customize the brightness and contrast levels to allow you to lighten up your video without losing quality.
In the Brightness & Contrast section, increase the Brightness and Contrast values to do this. The video preview to the left will allow you to see the changes immediately.
3. Save your video
Once you’ve made your changes, you’ll need to save your video. To do this, press File > Export > Media.
In the Export Settings window, determine the video format and codec settings you wish to use, as well as any other additional settings. Press the Output Name value to choose a new filename and save location for your video.
When you’re ready to proceed, press Export to begin saving your video.
A dark video means losing the details in your video, making for a poorer video clip overall. If you want to enhance your videos, you’ll need to brighten them using one of the tools at your disposal. You could brighten videos using Movavi Clips on your smartphone, a professional editor like Adobe® Premiere® Pro, or a good all-rounder like Movavi Video Editor. You can even adjust a video’s brightness using VLC during playback.
Most video editors will allow you to brighten up videos, although some tools are harder than others to use. If simplicity is what you’re looking for, Movavi Video Editor will get the job done in a few clicks. It comes with a 7-day trial, so don’t take our word for it – give it a go before you buy.
Movavi Video Editor
Сreate awesome videos easily
*The free version of Movavi Video Editor may have the following restrictions depending on the build: watermark on exported clips, 60-second video or 1/2 audio length limit, and/or some advanced features unavailable when exporting videos.

Frequently asked questions
See other useful how-to guides

Have questions?
If you can’t find the answer to your question, please feel free to contact our Support Team.
Join for how-to guides, speсial offers, and app tips!
1.5М+ users already subscribed to our newsletter