Need to record a Flash video? Try Movavi Screen Recorder!
- Download Movavi Screen Recorder.
- Adjust the recording settings.
- Record your Flash video.
- Export the result.
5 Ways to Record a Flash Video
In this article, we'll see how to record a Flash video in five ways. You can choose a Flash video recorder from our list: a desktop screen recorder, an online service, a browser extension, an iOS and Android app.

Best for: capturing your own streaming videos, webinars, and online calls
G2 rating: 4.5 out of 5 stars, 46 good reviews out of 49
Platform: Windows, macOS
Price: HK$299
If you want to make a recording of your own video, one of the easiest and most convenient ways to record a Flash video stream is through desktop programs. These are generally compatible with Windows and Mac, but the disadvantage is that most are not free software. And if you find freeware, there are usually limits to the functions you can get with the Pro versions. Also, the free versions are often watermarked.
But Movavi Screen Recorder is one of the best Flash video capture software to record and save your videos. Movavi lets you separate the video into several parts without re-encoding or losing quality! Below, we explain how to use Movavi Screen Recorder to download your video from a website.
First, download and open the installation file. Follow the on-screen instructions to install the Flash video recorder. Then open the program by double-clicking on the icon.
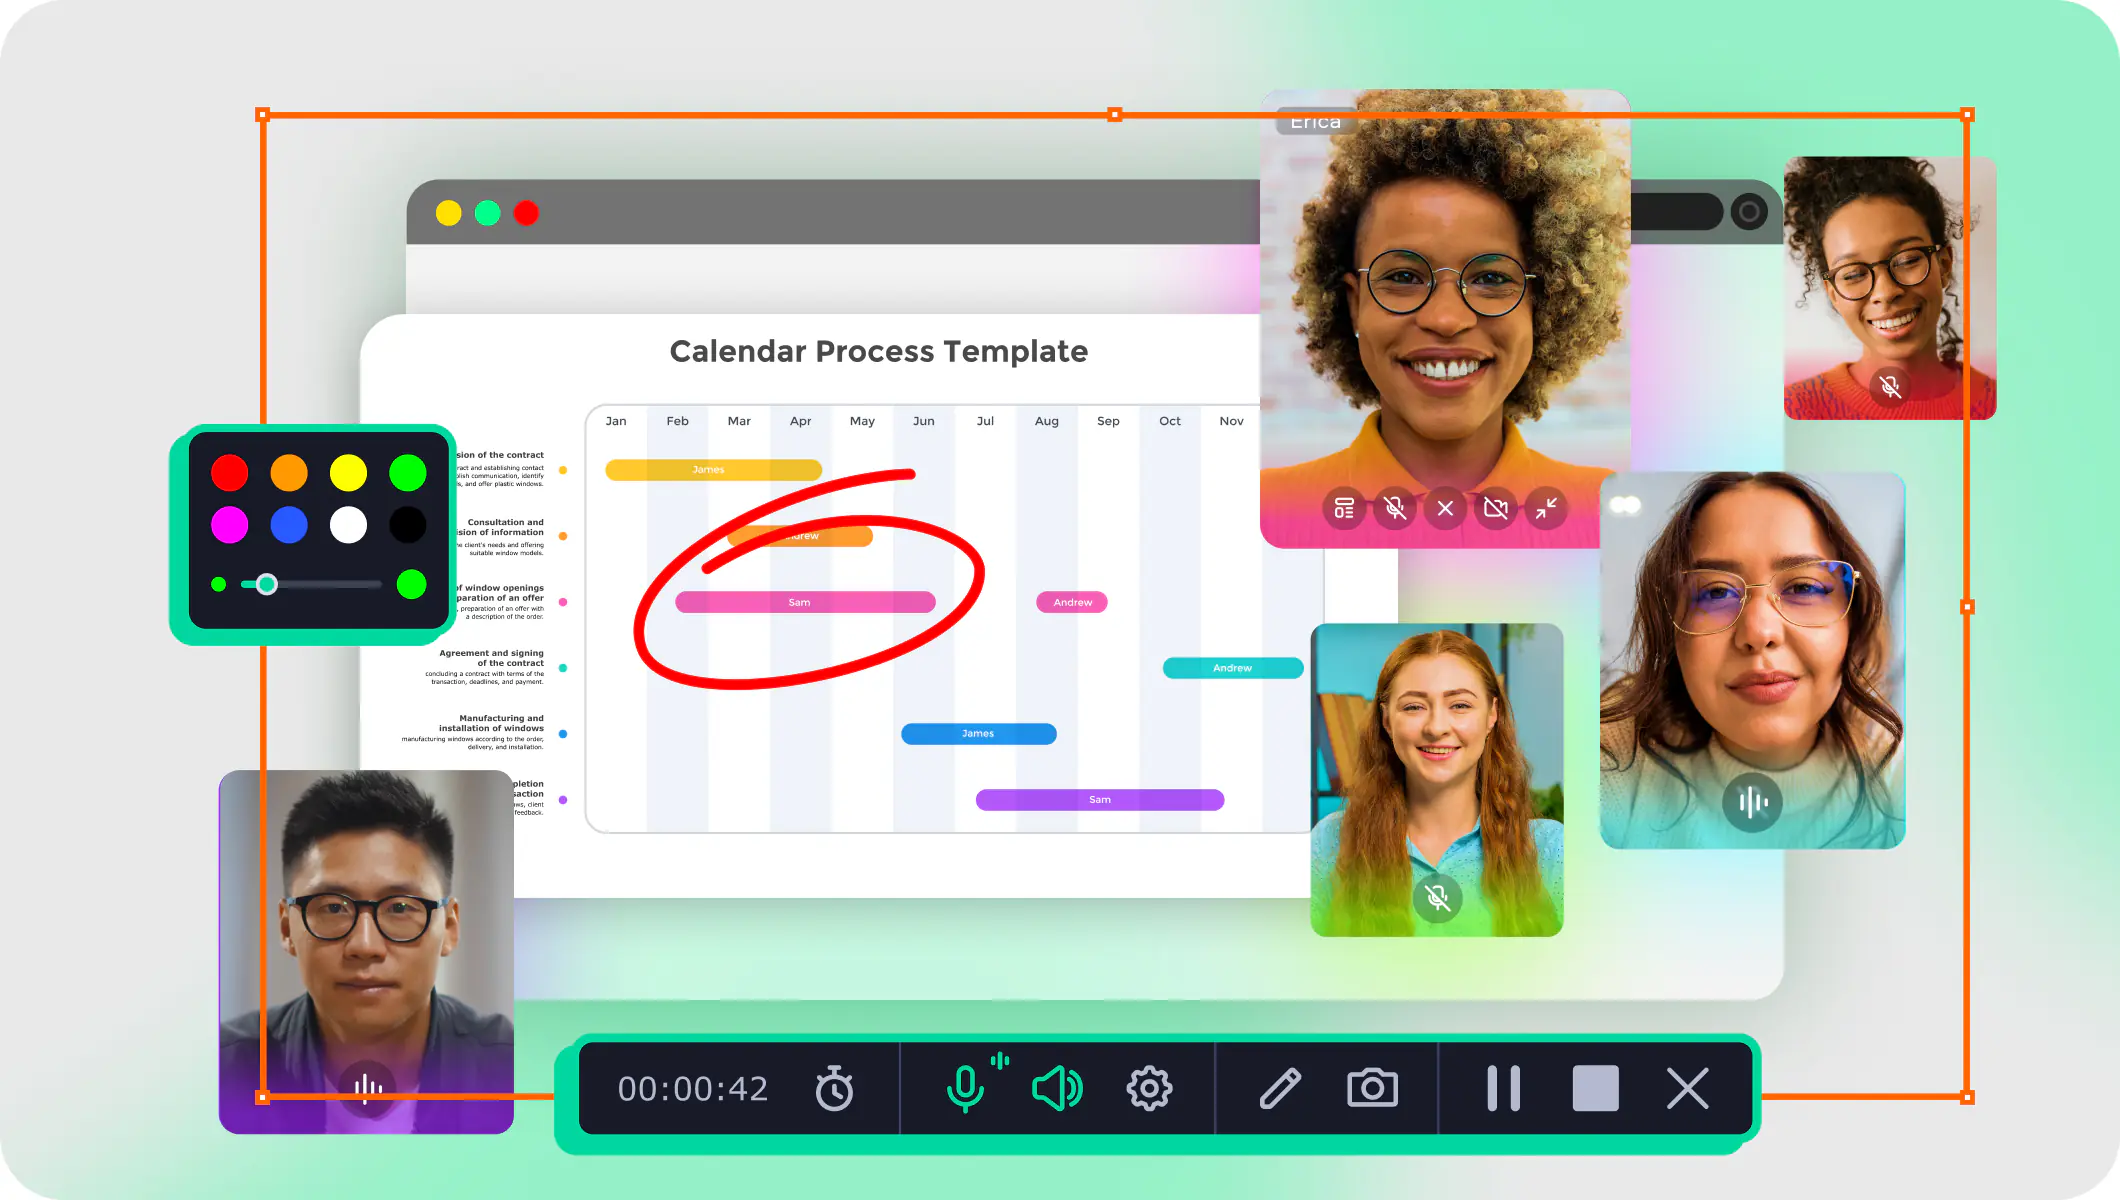
Launch Movavi Screen Recorder and find the Screen recording icon on the sidebar. Adjust the capture area by dragging on the edges of the orange frame.

Ensure that System Audio is on and the Microphone is off (as shown on the screen). In this case, the sound from the video will be recorded, but no external sounds will appear in the clip.
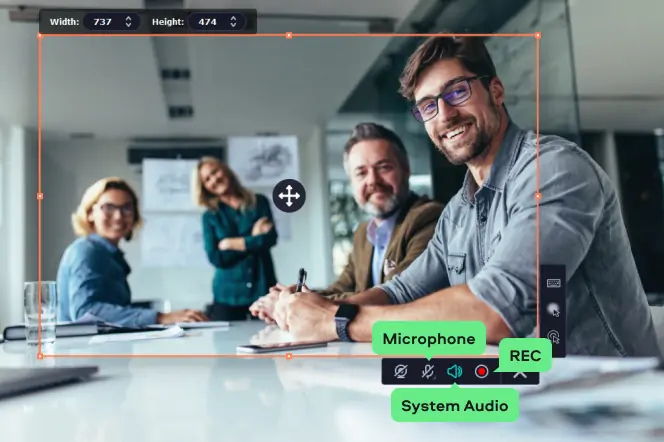
Hit the REC button and start playing your video. Click Pause when you want to take a break or Stop when you’ve finished capturing. You can also manage the process with hotkeys: in Windows, press F9 to pause/resume and F10 to stop recording. If you use a Mac, press ⌥ ⌘ 1 and ⌥ ⌘ 2, respectively. Your recording will be automatically saved in MKV format and appear in a new preview window after you click Stop. If you want to change the format, go to the next step.

In the preview window, click Export. Enter the name of the file at the top of the window. Files are automatically saved to the Movavi Screen Recorder folder. Now you can select one of the available presets: choose the one that best suits your requirements. When you’re ready, click the Save button.
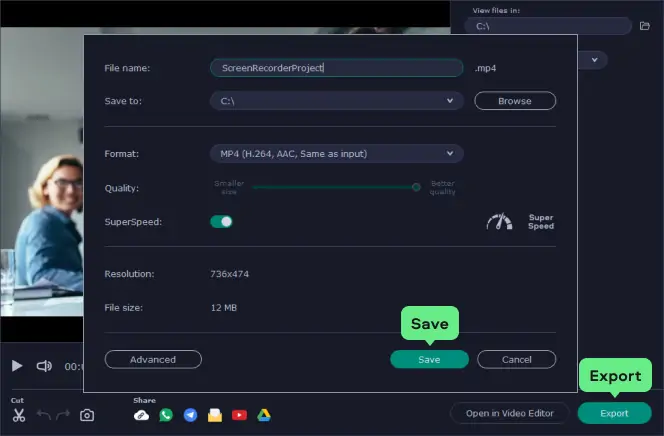
Now you know how to record Flash videos and use Movavi Screen Recorder as a converter to save captured videos!
Best for: instant screen capture
Trustpilot rating: 4.6 out of 5 stars
Platform: web-based
Price: $9.95/month
You can save your Flash videos using online services. However, in most cases, you have to download and install a specific app for that.
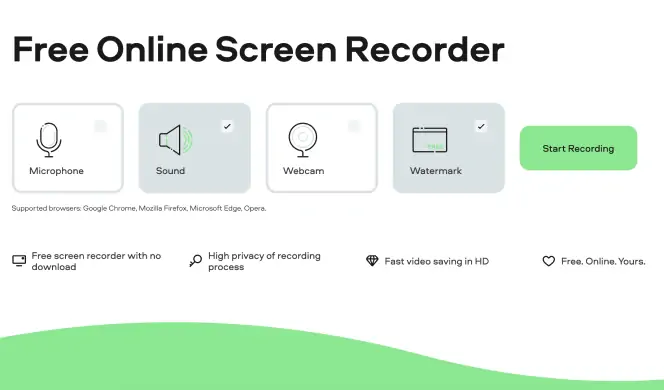
Screencapture.com offers one of the best features for screen recording. And the big deal is that the service is free in exchange for a watermark on the video. It works on Google Chrome, Opera, Microsoft Edge, and Mozilla Firefox. On Screencapture.com, you can copy files and share them. The service is 100% available on the web and doesn't need a download. It has a high level of security and privacy and saves high-definition videos faster.
To use Screencapture.com, follow the procedure below:
Best for: creating educational tutorials and demos
Chrome Web Store rating: 4 out of 5 stars
Platform: Google Chrome
Price: free
With browser extensions, you don't have to save and install extra programs on your PC. Still, to perform additional functions through your web browser, you can install extensions on your browser so that when you want to record, the installed extension will act as a built-in program, offering a seamless recording and saving process. But browser extensions are not ideal for old PCs or PCs with low RAM as they can slow down the PC or web browser performance or even cause it to stall. Also, most browser extensions work on desktop computers alone.
One of the best browser extension tools to capture Flash videos is Screencastify. If you use Chrome as your browser, Screencastify is a good option for screen recording.
Screencastify's capturing capabilities are not dependent on additional plug-ins, such as Java or Flash. You can even use it on Chromebooks. And videos recorded with Screencastify can be saved to your hard drive, posted directly to YouTube, or uploaded to Google Drive with a simple click.
The free version allows you to record videos of up to 10 minutes, which in many cases is more than enough.
To record with Screencastify:
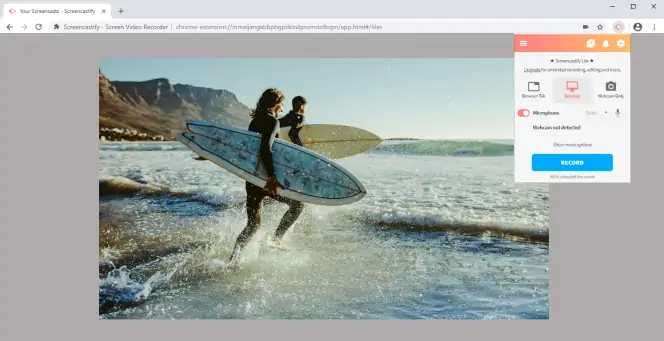
Click on the extension icon so you can open the control panel for recording.
Click on Desktop (there is no need to click Webcam and Microphone).
Click on Show More Options and activate the System Audio so that you can capture audio coming from the computer. However, this option is not available for Mac users.
Click on Record and then opt for Entire Desktop capture, and a countdown will begin.
Next, go to the Flash file and play it.
When you're done, tap on the Screencastify icon and stop the recorder. Next, you'll be able to edit, save and/or share your recording.
You can install the extension by following the link below:

Best for: iOS-operated devices
Platform: iOS
Price: free
The screen-recording feature on iOS can be useful for creating tutorials, sharing a video game, or illustrating a manipulation without necessarily going through the screen-recording feature on Mac. It is also available on an iPad equipped with iOS 11, 12, or iPadOS.
Here is how it works in detail:
Add Video Recording Shortcut to Control Center. First of all, you have to go to Settings to add the video screenshot shortcut to the control center. By going to Settings and Control Center, you can manage the commands accessible from the Control Center, particularly on the Customize commands page.
Look for Screen recording in the list. Add it to the top list named Include by pressing the green plus sign. That's it. If all went as expected, the shortcut for the screen video capture function is now integrated into the Control Center.
To start recording the screen, you must first display the Control Center. On iPhone with Face ID (and on iPad with iOS 12 or later, or iPadOS): swipe down from the top right corner of the screen. Record the Flash file as it is being played.
To stop recording, just press the same button on the Control Center again. The video is saved to the Camera Roll or sent to the chosen app.
Learn more about the built-in recorder by following the link below:
Best for: screen recording and editing
Google Play rating: 4.5 out of 5 stars
Platform: Android
Price: free
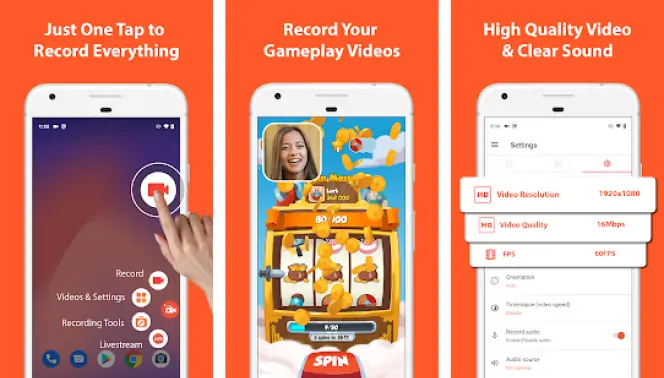
Phones with OS inferior to Android 10 don’t have the feature to record internal audio. On Android 10, you can use a third-party app like AZ Screen Recorder, which you can find in the Google Play Store.
To start, go to the Play Store to download AZ Screen Recorder and install it.
Tweak the video recording settings to your needs.
Tap the red camera shutter in AZ overlay, and the recording process will begin.
Navigate to the Flash video and play it while AZ keeps recording.
When the video stops, pull down your notification slide and tap Stop.
The video will be saved to your phone automatically.
You can download the Flash video recorder by following the link below:
Conclusion
We hope that the methods recommended in this article will let you capture videos in a breeze and have it saved appropriately on your device in specific or selected formats. Here are a few important things to consider when choosing the best screen recorder:
OS compatibility: this is one of the most important things to consider. Whether you’re using a Mac, Linux, or Windows system or looking for a recorder with an iOS or Android app, you need to ensure the software you choose is compatible with your OS.
Video quality: some recorders capture your screen in SD quality, while others offer HD 1080p resolution. If professional, crisp videos are a must, you’ll want to opt for those providing HD output.
Video output/download: look for a screen recorder that allows you to download your videos to your device – or to the Cloud if you don’t want to store files on your hard drive. There are some programs that don’t do either and simply allow you to share your creations online. Also consider what output formats are supported, such as AVI, MP4, MOV, etc.
Editing tools: some recorders have no editing tools at all, others offer basic tools to trim and crop your videos, while some have a full editing suite available to help you create polished, professional videos.
Markup: if you’re creating tutorials or training videos, you might want a screen recorder with markup options so you can annotate and draw on your screen captures.
Watermarks: you’ll find free programs that watermark every video, and those that don’t – so if you don’t want branding on your captures, look for one where you can remove watermarks.
Audio quality: it’s not just the video quality that matters – the audio is also vital to ensure those watching your video can understand what you’re saying. Some recorders only use system audio, but for the best audio quality – without background noise – look for one that allows you to use an external mic.
By taking some time to think about the factors and features that matter the most to you, you’ll have a better chance of choosing the best recorder to suit your needs.
Movavi Screen Recorder
The perfect way to record anything from your screen
Disclaimer: Please be aware that Movavi Screen Recorder does not allow capture of copy-protected video and audio streams.
See other useful how-to guides
Have questions?
If you can’t find the answer to your question, please feel free to contact our Support Team.
Join for how-to guides, speсial offers, and app tips!
1.5М+ users already subscribed to our newsletter