Need an easy way to crop pictures?
Try Movavi Photo Editor!
- Image restoration with neural networks
- Effective object and background removal
- Automatic photo enhancement in one click
- User-friendly interface with tips
How to crop a photo
You don’t need to study comprehensive picture editing software if you just need to crop a photo. The best way is to try a simple yet powerful tool like Movavi Photo Editor. You can use this handy app as a photo cropper for a variety of purposes: cut out certain picture elements, zoom in on the main focus of the image, make passport-size photos, and more.
Just download the appropriate version of the program – for Windows or Mac – and read the following step-by-step guide to learn how to crop photos.1. Install Movavi Photo Editor
After downloading the installation file from our website, double-click on it to start the installation process. Follow the on-screen instructions.
2. Add your photo
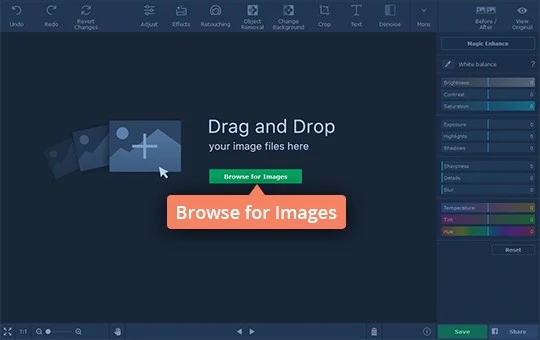
Click the Browse for Images button to open the file you’re going to work with. Alternatively, you can simply drag-and-drop it into the working area.

3. Crop the image
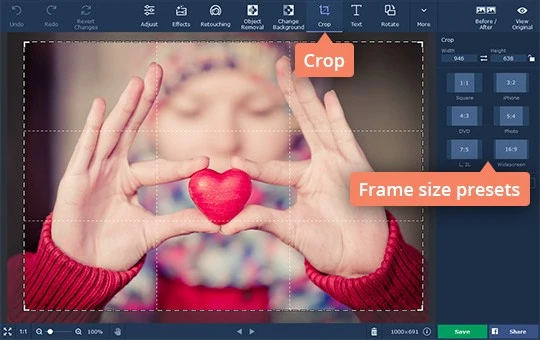
Once the image has been added, click the Crop button at the top of the program interface. The dotted line frame shows the area of the picture that will be cropped. To change the size of the frame, just drag the appropriate edges of the frame. Move the frame over the picture until you’re happy with the proposed final image.
You can also choose one of the preset proportions for the crop frame: Square (1:1), iPhone (3:2), DVD (4:3), Widescreen (16:9), and more.

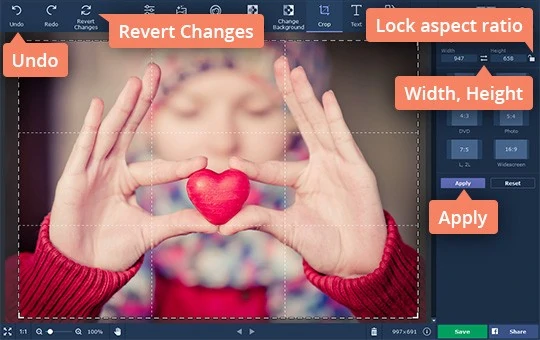
If every pixel counts, you can specify the crop frame size manually – just enter the desired number of pixels into the Width and Height fields. To maintain the selected proportions, click Lock aspect ratio.
When you’ve marked the required frame area, click Apply to see how the cropped image will look. To start over, just click the Undo button. And remember that you can always undo the changes by clicking the Revert Changes button.

4. Save the cropped image
To save the finished picture, click the Save button in the lower right corner and specify the destination folder, filename, and format. You can save your picture in JPEG, PNG, TIFF, BMP, or any other popular image format.

Movavi Photo Editor
Easily enhance images and get professional-grade results in a snap.
*The free version of Movavi Photo Editor has the following restrictions: you can save up to 10 images with added watermark, screenshots are disabled.

See other useful how-to guides

Have questions?
If you can’t find the answer to your question, please feel free to contact our Support Team.
You may also like
A comprehensive, streamlined video editing program that has everything you need to create amazing home movies with custom soundtracks, special effects, cool titles, and transitions.
An easy way to record from your screen in HD. Make video footage of any application, record online streaming video, webinars, even Skype calls, and save clips in all popular formats.
Join for how-to guides, speсial offers, and app tips!
1.5М+ users already subscribed to our newsletter