How to Record Minecraft on PC
Get Gecata by Movavi!
- Record HD game videos at up to 120 FPS
- Stream on any platform
- Grab sound from speakers or microphone
- Add webcam video to gameplay footage
Everyone loves Minecraft, regardless of age, from kids to seniors. Some people like to explore the game, looking for resources and running from creepers, while others prefer to build great structures like the Taj Mahal or the Eiffel Tower, and some concentrate on their own houses, farms, and equipment. Humorous graphics make the game even more engaging, and you can even add your own mods!
If you’ve ever played Minecraft, you know you can do almost anything there. This square world lies before you, and you can change it in the best way. Build the tallest skyscraper? Construct a creeper farm and get loads of gunpowder? Show off your achievements! Try to record a Minecraft video on PC for YouTube or other social networks. You’ll see your subscriber numbers increase dramatically.
And here, we’ll tell you how to record Minecraft on Windows 10! You can use different programs: recording your screen is easy with OBS or with Shadowplay, but we recommend Gecata by Movavi. Just a few clicks – and the whole Internet will be able to watch you playing and comment on your gameplay.
How to record Minecraft on Windows 10
Step 1. Download and install the software
Get Gecata by clicking the button on this page. Double-click the installation file and follow the on-screen instructions. Adjust the installation options if necessary. When the process is complete, run the software. Please note: Gecata is designed to work with the Windows 10 version of the game.
Step 2. Specify the settings
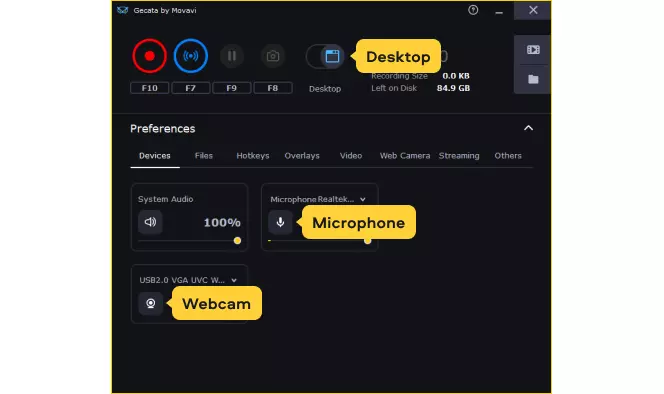
In the main program window, you’ll need to change some options. First, switch to Desktop mode – this is the appropriate option for games running in window mode. Then turn on your microphone and (optionally) your webcam by clicking the corresponding icons. Now you’re ready to rock!

Step 3. Start recording
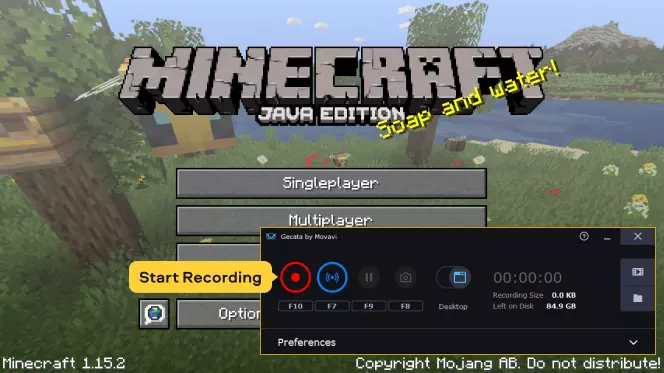
In the main window, you can see the amount of space remaining on your hard drive, estimated future video file size, and video duration. After you start capturing the gameplay, the software will run in the background and won’t interrupt the process. Click the Start Recording button in Gecata, then launch Minecraft and start playing.
As Gecata is invisible during the gameplay, it’s easier to use hotkeys when you’re in-game: F10 to start or stop recording, F9 to pause or resume, F8 to take a screenshot, or F11 to display an overlay with the recording data.

We recommend you record the whole gameplay session to be sure you don’t miss anything important or just amusing. So, after you exit the game, end the recording process by clicking the Stop button. Click the Folder icon to access your saved files. Now you can go ahead and watch your videos and upload them to your YouTube channel, another video service, or social networks.

Now you know how to record Minecraft gameplay on PC with voice. Share your videos and gather your likes!
Summary: How to record Minecraft in the best way possible
Here are some tips that can help you with recording Minecraft in high quality:
Find the recording software that fits your needs. There are several excellent free and open-source screen recorders available. If you're unhappy with the free options, purchase a paid recorder. But read user reviews and try out the trial version first.
Balance the recording parameters. Resolution, frames per second (FPS), and bitrate all have an impact on video quality and consume resources of your system. If your PC is still having problems with playing and capturing footage at the same time, try tweaking those parameters for better performance.
Consider upgrading your PC. Modern games grow more and more demanding to your hardware. Therefore, striking the right balance of quality and performance with settings alone becomes more difficult. Recording games with the most high-end graphics may require nothing less than upgrading your PC.
Use a capture card if necessary. If you're intending to record your games only on a PC, you won't need a capture card. However, an internal or external video capture device is required to record footage from consoles and cameras. External capture cards are more portable, easier to use, and more affordable than internal cards. Internal capture cards connect directly to the motherboard, allowing for faster data transfer and more dependability.
Frequently asked questions
See other useful how-to guides

Have questions?
If you can’t find the answer to your question, please feel free to contact our Support Team.
Join for how-to guides, speсial offers, and app tips!
1.5М+ users already subscribed to our newsletter